Switch-Adapted Drawing Machine
Enabling Independent Creative Expression Through Assistive Technology
Role: Product Designer, Visual Designer, 3D Designer, Researcher, Developer
Timeline: September 2024 - Ongoing
Organization: TOM @ Carnegie Mellon University
Team: Kimberly Blacutt, Audrey Reiley, Robert Zacharias
Need Knowers: The Watson Institute (Pittsburgh, PA)
Open-source pen plotter enabling independent creative expression for students with motor challenges
Assembly Guide | Live Plotter Web Tool | Github Repository
Project Origin: TOM Fellowship & First Visit to Watson
In 2024, I became a TOM (Tikkun Olam Makers) Fellow at Carnegie Mellon University. A central part of TOM's mission is to connect need knowers (people who intimately understand disability needs) with makers (designers, engineers, students) to co-create assistive technology solutions.
As TOM Fellows, Audrey Reiley and I founded a maker club at CMU and began building a relationship with the Watson Institute, a school serving children with disabilities in Pittsburgh. Our goal: discover opportunities where makers could address real needs.
The Discovery Moment
On our first visit to Watson, we explained to the occupational therapists and art teachers that we were interested in creating accessible creative tools. One occupational therapist enthusiastically showed us what they were currently using: a simple switch-adapted stamping tool. The tool was basic but clever. When a child pressed an adaptive switch (a large external button), it triggered a mechanism that lowered a drawing utensil (like a thick marker) to touch the paper, making a mark.
This sparked the question: What if we could take this concept further? What if children could control not just single stamps, but continuous drawings, patterns, or even their own names?
Building Understanding Through TOM Fellowship
Through our TOM fellowship work, we had been organizing switch-adapting workshops at CMU, teaching students how to modify electronic toys so they could be operated with adaptive switches. This gave us two critical insights:
Technical knowledge: We understood how switch adaptation works electrically and mechanically
Context of need: We learned that commercial adaptive switches cost $70+ each, and there's significant demand for switch-adapted tools and toys
Each subsequent visit to Watson deepened our understanding. We observed art classes, talked with occupational therapists about motor constraints, learned from art teachers about curriculum needs, and most importantly, watched children interact with existing tools. These "need knowers" helped us understand not just what was needed, but why and how any solution would fit into their classroom ecosystem.
The drawing machine project emerged organically from this relationship-building process.
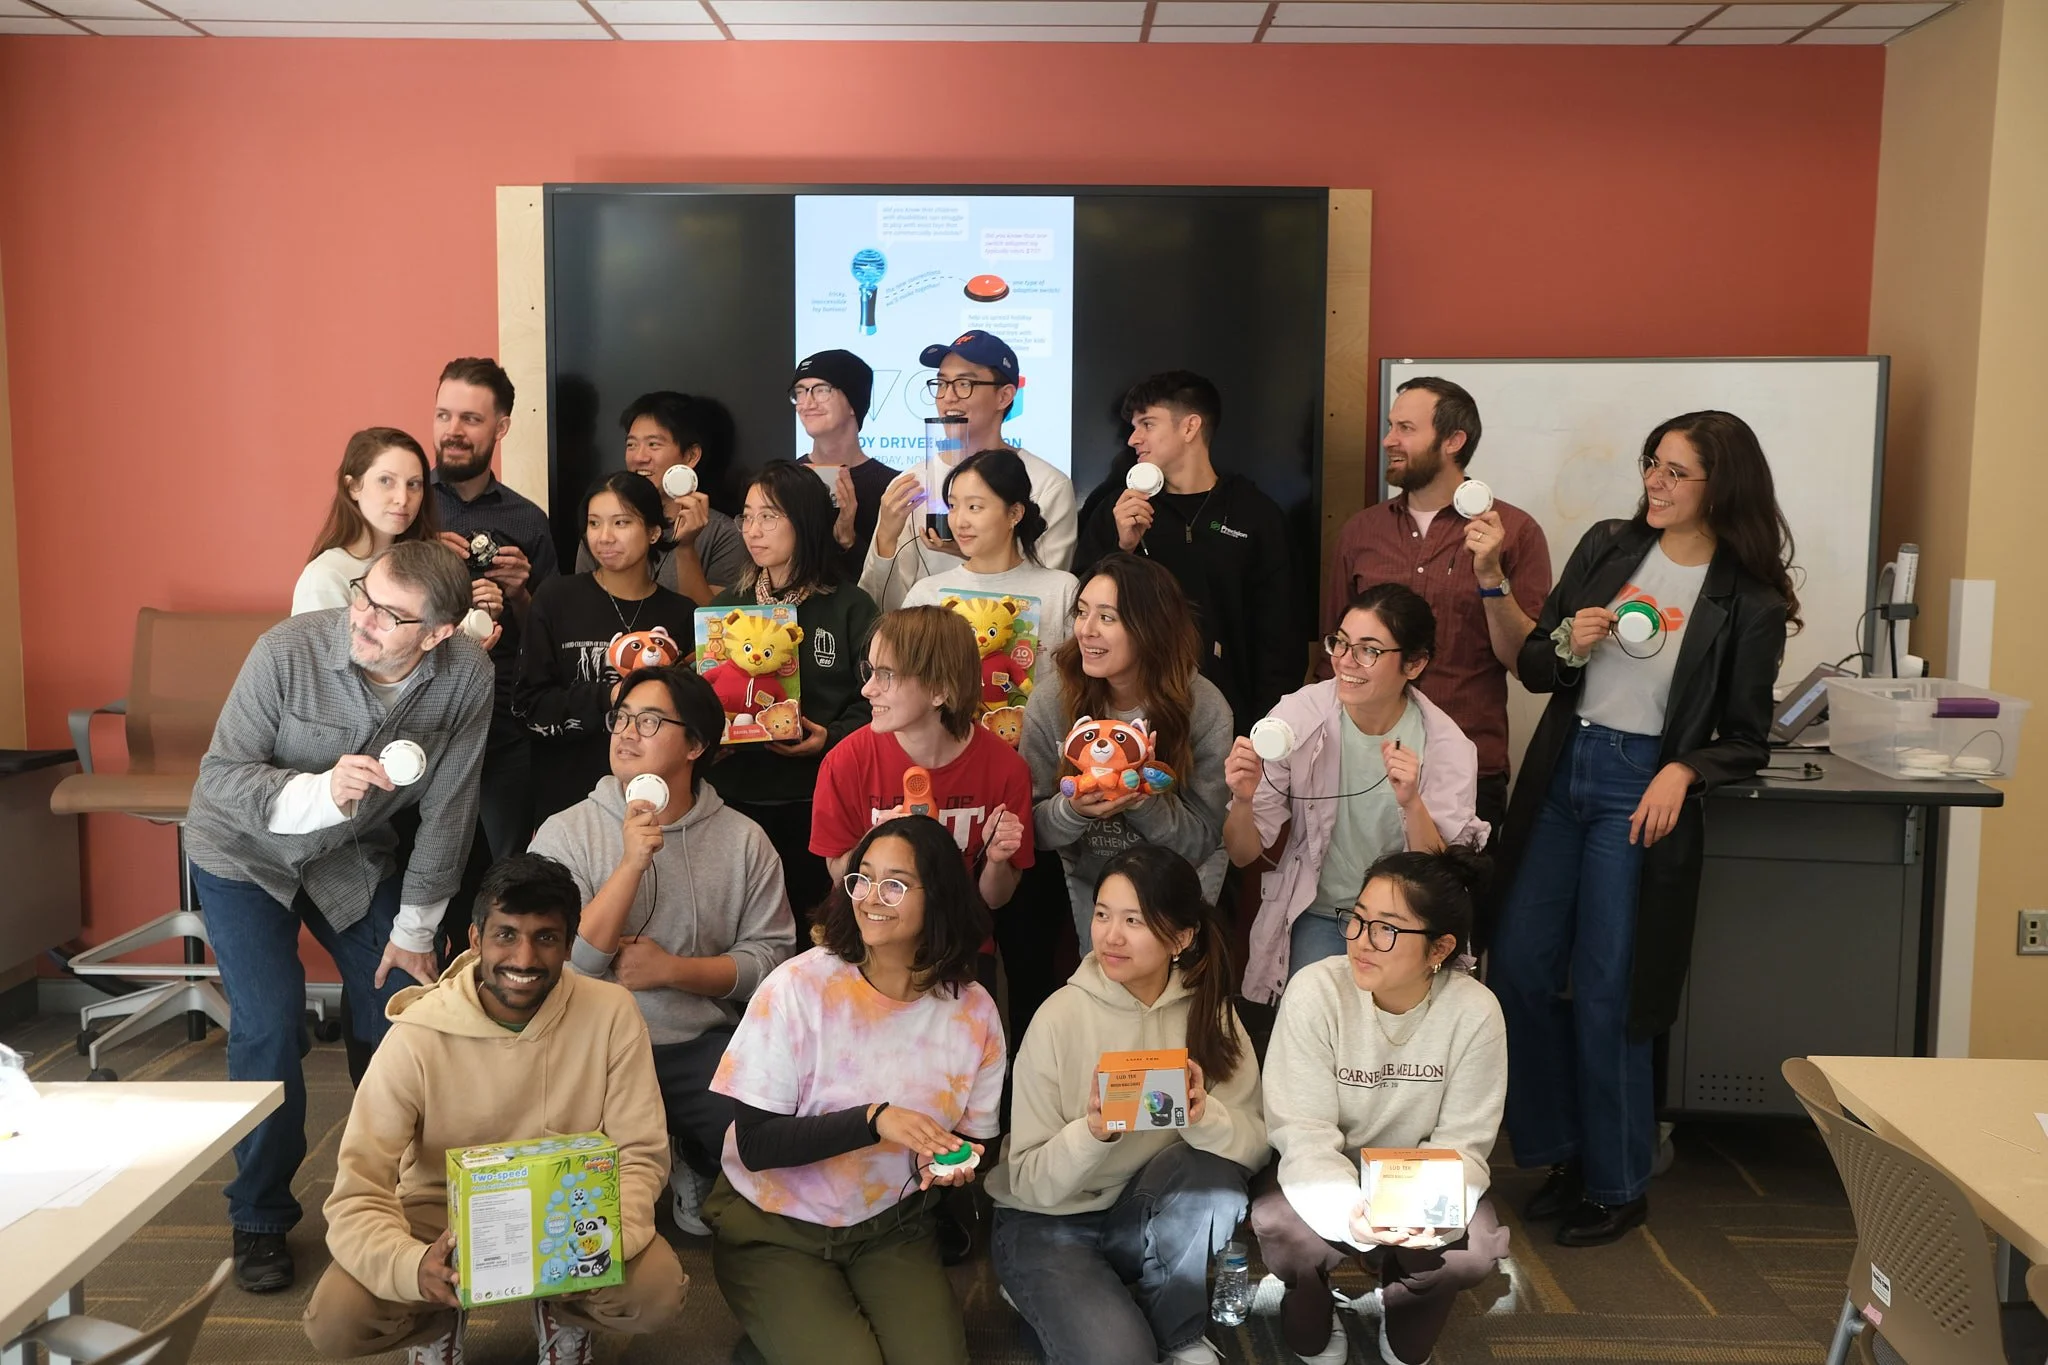
TOM Fellowship Impact (Broader Context)
Through the TOM fellowship at CMU, our maker community created impact beyond the drawing machine:
Audrey and I founded and registered official maker club at CMU
I designed event posters and promotional materials applying TOM's brand identity (posters shown here)
Organized 2 skill-building workshops teaching 40+ students soldering, wiring, and switch-adapting techniques
Facilitated 3 hackathons where students created adapted toys, gaming gear, and educational tools
Coordinated distribution of 13+ adapted devices to children at Watson Institute
Helped establish an ongoing partnership between CMU, University of Pittsburgh, and Duquesne University
The drawing machine became my passion project within this broader ecosystem of assistive technology making, community building, and sustained engagement with need knowers.
Project Overview
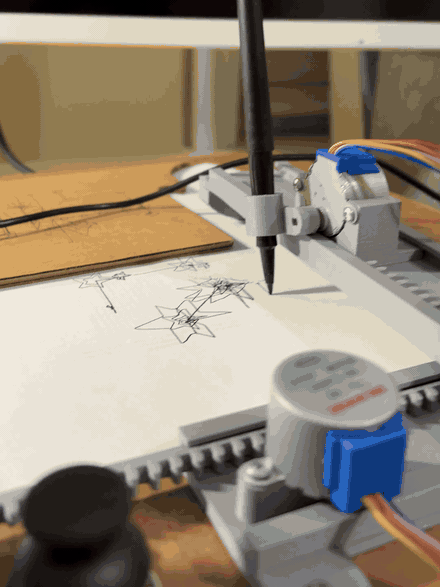
An open-source, switch-adapted pen plotter designed for students with motor disabilities, enabling independent creative expression during art class. The system consists of:
Custom hardware: Arduino-powered XY plotter with switch inputs
Web-based design tool: Teachers create content without programming
User-centered interaction patterns: Designed for 1-2 switch operation
Key Achievement: Translating complex drawing capabilities into a 1-2 switch interface through iterative user-centered design, making digital art creation accessible to students who previously required one-on-one teacher assistance.
This project showcases integrated skills across research, design, fabrication, and development while demonstrating the ability to build meaningful partnerships with need knowers, lead complex projects through iterative implementation, maintain intellectual honesty about design process, and contribute to open-source assistive technology communities.
The Problem Space
What We Observed
During art classes at Watson Institute, students with motor impairments waited extended periods for individual teacher attention to continue their artwork. While the switch-adapted stamping tool provided some independence, it was limited to single marks. Students had little creative control and couldn't produce continuous drawings, write their names, or create patterns.
Core Challenges Identified
Through observation sessions at Watson Institute and interviews with occupational therapists, physical therapists, and art teachers, a clear picture emerged: students using adaptive switches face compounding barriers to creative expression. Individual adaptive switches alone cost $70+ each, creating significant budget constraints for under-resourced schools. Beyond cost, existing solutions offer rigid, pre-programmed content that doesn't adapt to changing curriculum needs or individual student interests. The physical constraints are equally demanding: classroom environments require durability to withstand drops and rough handling, while teachers need content creation workflows that take minutes, not hours. Most critically, students typically operate only 1-2 switches simultaneously, ruling out any interface requiring complex multi-button coordination.
Commercial adaptive switches cost $70+ each, limiting what schools can afford
Few affordable, programmable art tools existed for switch-adapted interfaces
Students typically operate only 1-2 switches simultaneously due to physical and cognitive limitations
Teachers require simple ways to customize content without technical expertise or excessive prep time
Tools We Explored
During our research, we tested several adaptive switches including the Interact Switch (designed by Michael Turvey, available through Makers Making Change). We 3D-printed and assembled multiple Interact Switches during our workshops.
Research Methodology
Led collaborative research sessions with Watson Institute team over 6+ months, treating them as need knowers who bridge between user needs and design solutions.
Approach: Need Knowers as Research Partners
Rather than observing children directly for every insight, we worked collaboratively with Watson staff who know these students intimately. Occupational therapists explained motor control patterns. Physical therapists advised on positioning and safety. Art teachers shared curriculum goals and classroom constraints. This partnership model, central to TOM's philosophy, allowed us to design responsibly while respecting the children's dignity and time.
Critical Insights That Shaped Design
Adjustable Drawing Angle
Custom-designed hinge mechanism allows teachers to adjust the drawing surface from flat (0°) to vertical (90°) based on each student's positioning needs. This addresses the critical insight that many students work on angled boards rather than flat tabletops.
Solution: Integrated Physical + Digital System
How the Ecosystem Works
The system involves three key actors and two main touchpoints:
1. Teacher/Caretaker Preparation (Web Tool)
Teacher uses web-based design tool to create content
Chooses mode: text (names, messages), patterns (spirals, grids), or images (shapes, icons)
Customizes size, position, and sequence
Exports G-code files to SD card
2. Student Creation (Physical Plotter)
Teacher loads G-code file and places paper on plotter
Teacher inserts drawing utensil (marker, pen) into modular holder
Student presses adaptive switch to trigger drawing
Plotter executes programmed artwork
Student experiences agency and creative control
3. Community Iteration (Open Source)
Complete documentation published under CC-BY-4.0 license
Other makers can build, adapt, improve design
Feedback loop extends beyond CMU/Watson to global assistive technology community
System Architecture
| Component | Web-Based Design Tool | G-Code Generation | Hardware Platform |
|---|---|---|---|
| Technology Stack |
HTML/CSS/JavaScript p5.js rendering engine Hershey font library localStorage save/load |
Vertex capture from p5.js Coordinate transformation Y-axis flipping (canvas to cartesian) GRBL-compatible output |
Arduino Mega + SD Reader ULN2003 5V Stepper Motors (X/Y) SG90 servo (pen lift) 1/8" switch input jacks |
| Features |
Text to Writing (8 fonts) Pattern Generator Image library Real-time preview |
72 DPI scaling Pen up/down commands Feed rate control Sequential file export |
SD card file loading 3 switch inputs Emergency stop button Joystick positioning |
| User Interface |
Browser-based (no installation) Click-to-place positioning Sequence composer Batch export |
Automatic coordinate mapping File naming (01_NAME.GC) Preview visualization Copy-to-clipboard option |
Offline operation No computer required Switch-only interaction Visual pen movement |
| Target Users |
Teachers Caretakers Art educators |
Processing Pipeline (Automatic conversion) |
Students with motor challenges 1-2 switch operation Independent classroom use |
Three-layer architecture: Web tool enables teacher content creation without programming → G-code pipeline translates to machine commands → Hardware executes student-controlled drawing
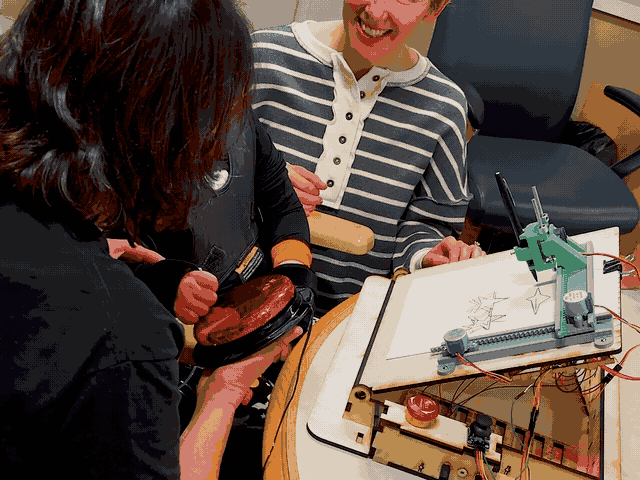
Interaction Design: Learning Through Iteration
The 1-2 switch constraint required creative thinking about input patterns. My initial solution failed during user testing, leading to a fundamental redesign that respects natural motor diversity.
Multi-Click Pattern Detection
Faced with the 1-2 switch constraint, I used temporal patterns to maximize functionality:
This design required rapid coordination and timing precision that students with motor challenges couldn't reliably execute. I had tested it on myself successfully, validating the technical implementation—but not whether it matched actual user capabilities.
The lesson: Testing on myself as an able-bodied designer confirmed the wrong thing. I couldn't predict motor constraints through empathy or self-testing alone.
Adaptive User Profiles
Rather than forcing one interaction method, the redesigned system respects natural motor diversity through two complementary profiles:
There is no one-size-fits-all interaction in assistive technology. Successful inclusive design requires flexibility to accommodate natural variation in motor abilities and interaction preferences. Teachers select the appropriate profile during setup based on each student's natural interaction style.
An early prototype I tested the rapid click interaction pattern with.

Web-Based Content Creation Tool
I built three integrated modes allowing teachers to create plotter-ready content without programming:
Software Design (Web Design)
1. Text to Writing Mode (Functional, try it!)
8 authentic Hershey single-line fonts (Script, Gothic, Simplex, etc.)
Point-based sizing (12pt-72pt) matching standard typography
Multi-line support with accurate 72 DPI scaling
Real-time canvas preview (WYSIWYG)
Click-to-place positioning or manual coordinate input
Sequence composer for multiple text items
Exports numbered G-code files (01_NAME.GC, 02_NAME.GC, etc.)
2. Pattern Generator (In Development)
Algorithmic patterns (spirals, radial arrays, grids, mandalas)
Parameter-driven customization (density, rotation, scale)
Unique outputs for each student
Randomization controls for variety
Interactive preview with real-time parameter adjustment
3. Image Library (In Development)
Pre-defined line art collection (animals, shapes, seasonal themes)
Drag-and-drop positioning on canvas
Real-time scaling and rotation
Educational icon integration
Searchable library with category filtering
Design System
Visual Identity: TOM brand colors (Teal #00A5B5, Lime #8DC63F, Coral #FF6B4A) • IBM Plex Sans typography • 8px spacing grid • WCAG 2.1 accessibility compliance
UI Principles:
Large, touch-friendly buttons (44px minimum)
High contrast text and controls
Clear visual hierarchy
Minimal cognitive load in interface design
Progressive disclosure (simple by default, advanced when needed)
Unexpected Creative Possibilities
While testing the web tool, I discovered it could render ASCII art from online sources like asciiart.eu—teachers could paste pre-made designs and instantly generate plottable artwork. This wasn't a planned feature, just an emergent property of the single-line font system.
If you build this system or experiment with the web tool, I'd love to see what you create. Please share your discoveries, adaptations, or improvements.
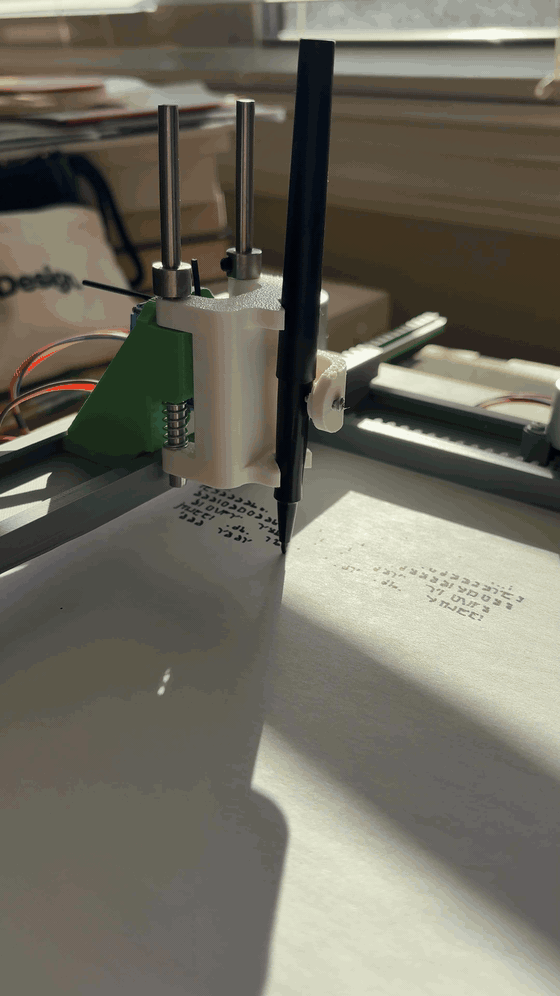
Hardware + Industrial Design
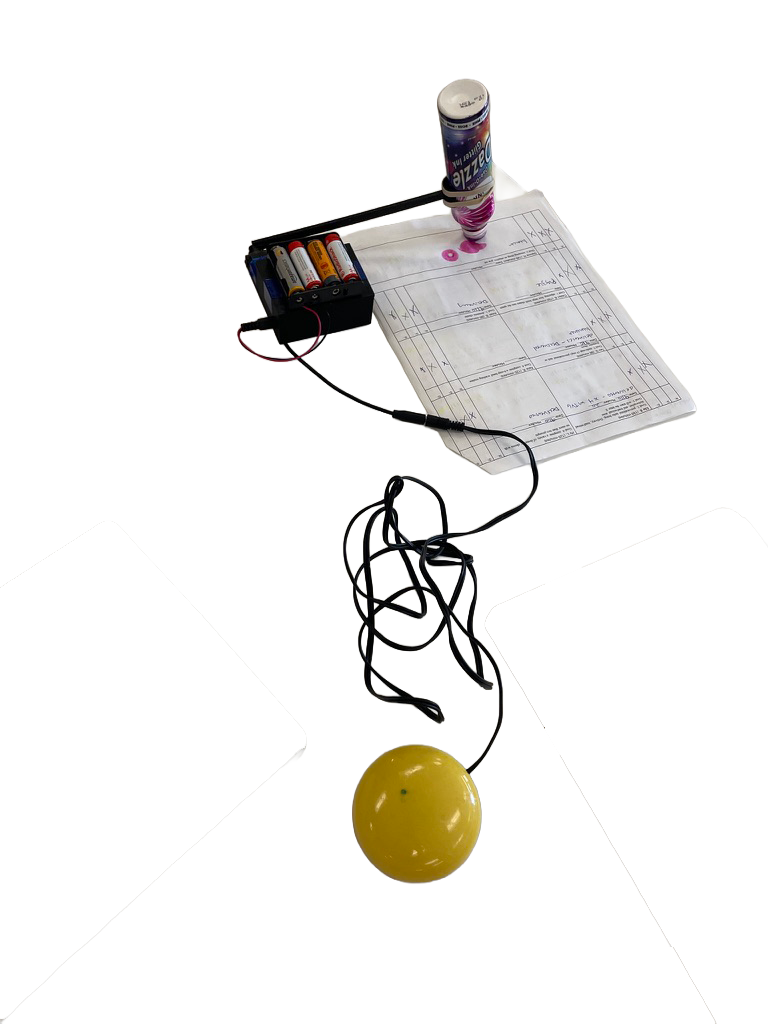
Custom XY plotter platform designed for durability, safety, and classroom use with students who have motor challenges.
- CAD-designed frame (Rhino 3D) with modular mounting system
- XY linkage derived from open-source Thingiverse design
- Custom 3D-printed pen holder and mounting brackets
- Laser-cut wooden structure (1/4" thickness)
- Protective electronics enclosure
- Table mountable with easel configuration
- Designed for safety, durability, and rough handling
Drawing area: 4.3" × 4.3" (letter-sized paper compatible)
3D-printed motor mounts, gears, and rails
Standard hardware
- Arduino Mega serves as central controller
- ULN2003 Driver Boards manage stepper motors (X/Y axes)
- SD card reader enables G-code file loading
- Joystick module allows manual positioning
- Three switch inputs
- 5V 1A via barrel jack
- SD card (G-code files)
- Standard 1/8" (3.5mm) phone jacks for switches
- Modified GRBL
- Switch input detection
- Calibration settings
- Queue management
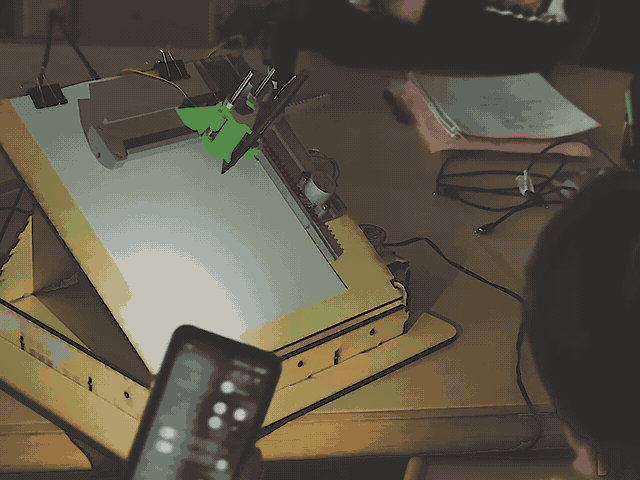
Prototyping Journey
This working system represents nearly a year of prototyping and iteration. Early versions included flat cardboard mockups tested at Watson Institute, followed by an angled cardboard prototype that validated the tilted drawing surface concept before committing to the wooden frame. The most significant pivot came from the drawing mechanism.
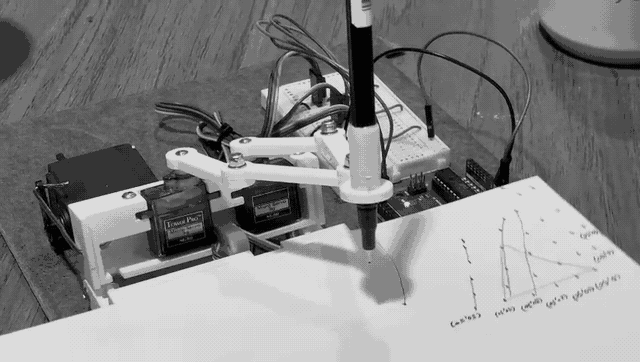
The initial prototype adapted an open-source "plot clock" design from Instructables, which used two servo motors controlling articulated arm segments (essentially a shoulder and elbow joint moving a pen through polar coordinates). While the mechanism worked in principle, it failed to meet the quality standard necessary for student artwork: lines were wobbly, shapes were inconsistent, and the servo jitter made even simple triangles unreliable. Students needed to feel proud of their creations, not frustrated by technical limitations.
The pivot to v2.0 required systematic research across commercial children's drawing toys, professional tools like AxiDraw, and various DIY plotter designs, evaluating each for precision, complexity, and switch adaptability. The breakthrough came when Zach identified an open-source cartesian design on Thingiverse that used sliding rails rather than rotating joints. Both motors move along rails in X and Y directions, positioning the pen holder through linear motion rather than angular rotation. Rebuilding with affordable 28BYJ-48 stepper motors ($2 each) and rewriting firmware for the new mechanism produced immediate results: clean, crisp lines and reliable geometric patterns. This experience reinforced that good hardware decisions come from systematic evaluation rather than iterative patching. Understanding why a mechanism works enables informed pivots instead of endless troubleshooting.
Plot Clock Mechanism
Attempted to switch-adapt a polar coordinate "plot clock" design using servo-driven rotating arms (Instructables tutorial). Arm linkage system proved unreliable for precise drawing.
- Unreliable polar coordinate positioning
- Servo jitter and inconsistent arm movement
- Struggled with basic geometric shapes (triangle)
- Fragile linkage system unsuitable for classroom
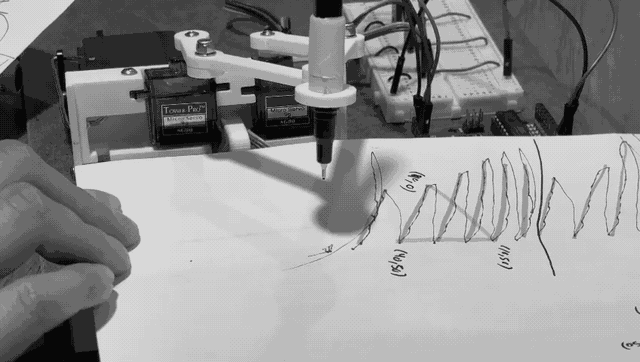
Cartesian XY Mechanism
Complete redesign using cartesian (XY) coordinate system derived from open-source Thingiverse designs. Reliable, precise, classroom-ready.
- Reliable cartesian coordinate system
- 28BYJ-48 stepper motors (precise control)
- Successfully draws text, patterns, ASCII art
- Durable wooden frame for classroom use